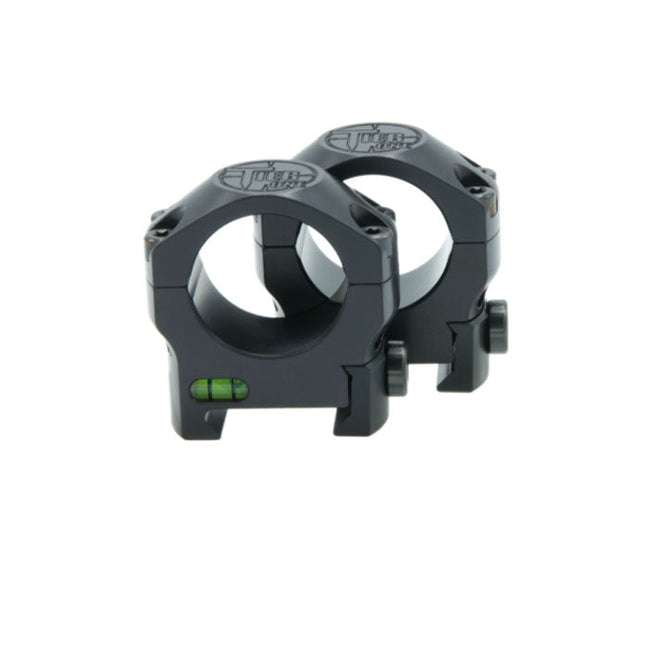
Tier One - Scope Mounts 30mm
Picatinny Low
These are 30mm Mounts.
Tier One makes some of the best scope rings on the market, high quality with a super high finish to them, made from a single piece of aluminium so you know the rings are true.
Ships in a display box, with 2 x heads for the screws.
Tier One Picatinny Rings are precision made on 5 axis CNC machinery.
All sets come with one mount with a bubble level installed ( not both )
The key to accuracy in manufacture is to minimise the number of operations required to complete the machining process.
By investing in new Technology, we have been able to cut the number of operations required from eight to two. By doing this, there is no accuracy loss due to re setting for different operations.
All Rings are made from solid billets of Aluminium 7075T6 alloy and are available in medium and high configurations.
Ring sizes from 1" up to 40mm Picatinny Rings available.
Due to the precision of the manufacturing process, lapping is not required when mounted on a quality picatinny rail.
Screws are stainless steel and manufactured by us on our own machines to the highest possible specification.
Low Mounts 30mm Picatinny Measurement A = 22mm
WHAT CALIBERS ARE THESE RINGS FOR?
We recommend torquing these rings to 18in/lbs because some scope manufacturers make their scopes from soft materials. Torquing any higher could cause marking or other damage to the scope tube.
If you're torquing these rings to 18in/lbs then we don't recommend using them with magnum calibers.
For magnum caliber rifles we highly recommend our one-piece mounting system, the Monomount. Or, the Tactical Rings, which are based on the Short Saddle mono but come in a two-piece format. Both have a much larger scope contact area.
CAN I OVERTORQUE THE TOP RINGS?
If you are happy that your scope is manufactured from a strong enough material to resist the extra pressure then you can, entirely at your own risk, torque them up to 26in/lbs as we do when using them on Magnum caliber rifles.
IMPORTANT: You MUST check with your scope manufacturer before you do this and we take no responsibility if you mark or otherwise damage your scope tube.
Tier One - From the Manufacturer
Picatinny Ringset Mounting Instructions
Our Picatinny Ringsets are manufactured to the highest tolerances, and it is advised to mount them on a suitable quality picatinny rail to get the optimum result. It is the purchaser’s decision to mount the picatinny rings and optic if they feel competent themselves, or seek advice from their favoured gunsmith.
Place your unloaded firearm on a stable work surface, preferably mounted in a suitable gun vice. If no gun vice is available, the firearms own bipod can be utilised instead. It is now important to ascertain the correct eye relief. First loosen the clamp screws with the T25 Torx bit supplied to allow loose placement upon the picatinny rail, now remove the ring cap screws using the supplied T15 Torx bit, and gently attach the rings onto your picatinny rail, lightly tightening at this stage, ensuring the rear most one does not foul on the firearms bolt when worked. You now have a starting point to set your correct optic position.
Place the optic into the rings and shoulder your firearm carefully, you may want to replace the ring caps very loosely to avoid letting your optic fall out of the mounts whilst doing this. As a guide, it is generally better if the rings are as far apart as possible to gain maximum strength and stability. Your optic should be set at the maximum magnification and if present, the parallax correction set to infinity. When viewing your optic from the shouldered position you should be able to see a clear image. If you can see a dark ring around the ocular lens gently move your optic fore or aft until this disappears. Great care should be taken at this point not to damage your optics finish. A pencil mark placed upon the optic as reference to the ring cap location will aid the final stage of mounting. You have now set the correct position for the ringset bases. Remove the ring caps and optic and tighten the T25 Torx screw on the ring claw to 4Nm, ensuring the ring bases are pushed firmly toward the muzzle to counter the effects of recoil.
Now place your optic back into the rings using your pencil datum points as a guide, replace the ring caps, and using the T15 Torx bit in your fingers only, tighten the screws gently and evenly to maintain an equal gap between ring base and cap. Only light pressure is needed as it is important at this stage to be able to turn the optic in the rings without damage occurring to the finish.
It is the installer’s decision to mount the optic by utilising the bubble built into the rear ring to level the rifle, and also a separate bubble placed upon the optics elevation turret cap, or by shouldering their firearm whilst viewing a suitable true vertical line, and rotating the optic gently until the bubble levels align, or the reticle matches the chosen vertical line. Care should again be taken at this stage to ensure no damage occurs to the optics outer finish. Once the installer is happy with the reticle alignment, the ring cap screws should be tightened gently and evenly, at opposing corners, whilst maintaining an equal gap to both sides, up to the recommended torque setting of 2Nm.
Care at this stage should be taken to ensure your optic remains level, and doesn’t move during the tightening process.
Read more less